Monday, October 20, 2008

Freebies

Sometimes it seems like the corals you buy don't do well but the ones you get for free have no problems. Here are a couple of hitchikers that came with my live rock.

The first is some sort of a yellow polyp. It prefers to open up after dark but sometimes it opens when the lights are on. It is really small, about the size of a pencil eraser.

From Paul's Reef

The next one is significantly larger; about an inch by an inch. I', not sure what it is, however, it does not appear to be aptasia.


From Paul's Reef

From Paul's Reef

It has grown since I inherited it but it is not a super fast grower. Hopefully it is nothing too nasty.

Wednesday, October 8, 2008

Where have I been?

I haven't posted for almost three months.

What's my excuse?

a. It's been summer
b. Lots of stuff going on at home.
c. Busy at work.
d. Cat ruined my camera by peeing on it.
e. All of the above.

If you answered "e" you are correct. Yes one of our cats, I mean former cats, micturated on our Canon Rebel XTi digital SLR. My wife found it sitting in a pool of urine on our kitchen counter. I had to take the camera completely apart and clean it with alcohol and Q tips. Miraculously it still works. Both cats have been returned to the No Kill shelter where we got them.

So, what's been happening lately in my tank?

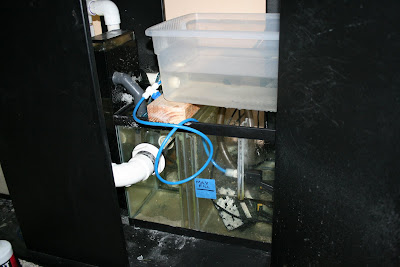
First, I completed my refugium with a deep sand bed. The largest size tank I could get in my stand was 10 gallons. Way too small for what I wanted so I used two of them. They are connected using 2" PVC pipe. I drilled holes in the tanks and used bulkheads to connect them.

The left tank contains the deep sand bed (DSB). It contains 30 lbs of sugar size Oolite sand and 40 lbs of live Caribbean reef sand mixed together. I also moved a few cups of sand from my main tank into the DSB.

From Paul's Reef

The right side houses my protein skimmer, auto top off system, sump and return pumps.
From Paul's Reef

The water flows down from my main tank into my refugium. I use a valve to control how much water flows into the deep sand bed (left tank) and how much flows into the right tank. The theory is that you don't want too much flow through the DSB. I have about half the flow going through the DSB.

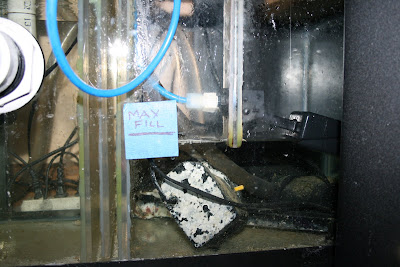
In the right tank I used a piece of acrylic to construct a chamber. The height of this wall sets the height of the water in both the chamber and DSB portion of the tank. I built the chamber large enough to house a bigger protein skimmer. For now I'm using my hang on the back Remora skimmer. It used to hang from the back of the main tank but has now been moved under the stand.

I have two additional dividers used to implement a bubble trap. The middle wall does not make contact with the bottom of the tank. This forces the water to flow down and then up on the other side of the center divider. Once the water flows over the right-most divider it is in the sump.

The sump now houses my heater and and two 802 power heads. I had these laying around so I used these instead of buying a "real pump". These power heads move a lot of water. They are rated for 400 gph with no head pressure. However, the flow pumping up 4 feet. I believe the flow is reduced roughly but I haven't measured it. Therefore, with my two pumps I am getting about 400 gph total. To use these you just have to shove plastic tubing over the exit orfice. Be sure the hose covers the venturi opening. My two pumps are slightly different. One of them has the venturi opening elevated so I can't shove the plastic hose over it. Instead I found an air stone that fits perfectly in the hole to block the flow.

Note the max fill line on the sump. If the sump is filled above this level and the power goes out I'll flood my family room. I drilled holes in the return pipes into the tank just above the water line to break the siphon when the power goes out.

Finally, I constructed a top off system using a Coralife float valve and plastic storage container and some fittings from Home Depot and Ace hardware. This works perfectly keeping the water level constant in the sump. I just need to remember to refil the fresh water reservoir with RO water every few days.

From Paul's Reef


I purchased and overflow box and constructed a Hofer Gurgle Buster to virtually eliminate all noise in the overflow box. It works really well and was simple to build.


From Paul's Reef

From Paul's Reef

The sand went in the tank on 8/2/2008. It is now 10/8/08, more than 2 months later. So after all of this have my nitrates gone down?

Nope.

Nitrates are still fluctuating between 25 and 50ppm as measured with my Salifert kit.

So now what? I purchased some Chaeto algae to put in the DSB side of the tank. Hopefully, the algae will absorb nitrate and reduce the level.

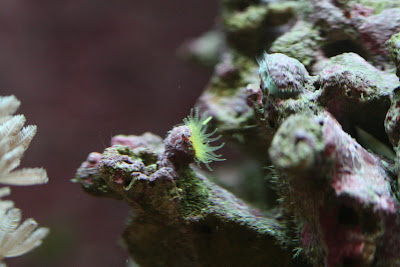
One final note. I chose to have water from the DSB / refugium flow into the chamber containing the protein skimmer. Many recommend against this because many of the copepods will get skimmed out. I did it because it made for a simpler design that maximized my water volume and reduced plumbing and pump requirements. I can tell you that after I added my DSB and sump I experienced a copepod bloom in my main tank. These "bugs" are crawling/swimming all over my live rock. I haven't seen any copepod corpses in the skimate.

Monday, July 21, 2008

If one sump is good...

The 20 gal tank I had planned to use for mys sump will indeed fit under my stand. Unfortunately, there is no way to get it in there. I can slide it vertically through one of the stand doors but there isn't room to tilt it down into position.

Plan B
I need to do this as inexpensively as possible so I'm not buy a pre-made acrylic sump nor am I going to take the time to custom make an acrylic sump that will just fit into the stand. The largest tank I can place into the stand turns out to be 10 gallons. I feel that a 10 gallon tank is too small. Once I add the deep sand bed and allow room for the water to rise in a power failure there won't be enough water volume in the tank. So, I'll use two tanks. It so happens that I have two of these already.

I will connect the two tanks together with PVC plumbing and bulkheads to allow the water to flow between them. One tank will have a deep sand bed and will serve as the refugium. The other tank will house the protein skimmer, sump and return pump. Water from my overflow box will flow into both tanks and I'll use valves to set the flow through the refugium. The output of the refugium will flow into the chamber that houses the protein skimmer in the second tank. A baffle will set the water level for the protein skimmer and refugium. Water from the overflow box that didn't go directly into the refugium will flow into the skimmer chamber. A set of baffles will eliminate bubbles as the water flows into the sump that houses the return pump. I'm also going to add a Durso Standpipe to my overflow box to cut down on noise. I am also going to add a float valve in the sump to handle automatic top offs. I'll post a set of plans soon and pictures when I complete it.

I can't wait to get started on this. My nitrates are still high and I need to do something soon. I'm losing my tongue coral. My glass hole saw and bulkheads are on order from glass-holes.com. Creative name, huh?

Tuesday, July 15, 2008

Vacation

Last week we rented a cabin on a lake on the border of Wisconsin and Michigan about an hour north of Rhinelander Wisconsin. On the way home we stopped at the Doctors Foster and Smith outlet store in Rhinelander. They were selling 160 gallon mix buckets of Reef Crystals for $29.99. I bought one bucket. I would have stocked up more if the van wasn't already bursting at the seams. Usually, the stores around here are selling Reef Crystal buckets for $60. I'm assuming that Doctors Foster and Smith are making money too so the LFS must be marking it up by more than 100%. By the way they charge $9.99 for shipping. So for $40 you can purchase this online and save $20 plus taxes over your LFS.

I also purchased a PF-800 overflow box and 40 pounds of live sand while there. These will be used for a refugium I'll be building out of an old fish tank in the base of my stand. I'm still undecided as to whether or not I'll add macro algae. I'll probably see if the live sand alone will reduce the nitrates.

Saturday, June 21, 2008

One More Nitrate Factory Removed

According to my Salifert test kit my Nitrates are at 25ppm and I have not been able to get it to drop below this. I then remembered that at the bottom of my protein skimmer's overflow box/bubble eliminator is a small sponge filter. I removed it but it really didn't look that dirty. I'll have to see if it makes a difference.

I just got the Salifert test kit this week. It measures Nitrate differently than the API and it has much better resolution at the low end. Unfortunately one of our dogs decided that the boxes for both Nitrate test kits were something it should eat. Fortunately they didn't eat any of the chemicals. However, the little syringe in the Salifert kit for measuring 1 ml of water got destroyed. I'll have to figure something out to measure the water volume.

Tuesday, June 17, 2008

I Lost My Brain

Over the last few weeks I've watched my beautiful rose colored open brain coral slowly die. As soon as I brought it home I noticed that part of its skeleton was exposed. I blogged about this back on April 28'th. I was worried then because I read that corals with such injuries rarely recovered. However, this one was doing really well. Here is how it looked one month ago. It was fully expanded and doing quite nicely.


This, as it turns out, would be the best I would ever see this coral. As I was battling my nitrate problem the health of this coral declined. I noticed that the area of exposed skeleton was expanding. First to the right side and then to the left.

Here is how it looked on July 10'th.


The green area at the far back is the are of original exposed skeleton. You can clearly see more exposed skeleton on the right side. You can also see some on the in the middle of the left side. The exposed skeleton became overrun with the red algae that you can see behind the coral on the sand bed. I blew it off with the current from a power head.

I knew at this point that this beauty wasn't going to make it. I didn't realize how quickly it would die. One week later, yesterday, it looked like this.


The only flesh remaining was on the section closest to the bottom of this photo. Here is a close up view.


I thought it was odd to see the stringy webby material all over the last remnants of the coral. I hadn't seen that before. I read about this today and it matches the description of Brown Jelly Disease. A highly contagious bacterial infection that attacks LPS corals. Some articles I read pointed out that it can spread quickly and finish off a coral in a day. Indeed, when I came home from work today all that remained was a calcium skeleton. A paper weight.

Incidentally, for the last week or so, my green open brain coral has refused to open. It's as if it senses the disease in the tank and is cowering in fear. I hope this guy lives. Here is how it looked yesterday.


So far there is no exposed skeleton so I am holding out hope. I've increased the current across it as recommended.

In other grim news, my torch coral doesn't look good either. It is no longer expanding completely. My red scooter blenny is also MIA. It was looking thin last time I saw it. After I bought it I realized it was a member of the dragonet family. Like it's cousins, the Mandarins, they are supposed to be difficult to keep because they only eat live food they find on the live rock and sand bed.

Looking on the bright side, my Xenias are still doing well. Pulsing away seeming oblivious to the the demise of their tank mates.

Tuesday, June 10, 2008

Xenia update

I've done countless water changes over the last few weeks to dilute my nitrate levels after removing my Bio-wheels. I can't tell what my nitrate level is now because the color for 5ppm and 10ppm look identical. What I can tell you is that my Xenia look a whole lot better. They are growing, the polyps are full and they are pulsing like crazy. And perhaps most importantly there is a little baby Xenia between mom and dad. This baby is growing where the connecting piece had stretched out between the main coral and the one that branched off. You can see it in the picture below.